Reverse Engineering Meets Symbolic Execution
Reverse Engineering and Symbolic Execution of License Validator ChallengeSafety & Legal Notice : This material is provided solely for research, education, and defensive cyber security purposes. Do not execute, install, or interact with malware or exploit code on personal, corporate, or production systems. Samples must only be analysed within properly configured, isolated, and legally authorised sandbox or laboratory environments by appropriately qualified personnel. RedFenec disclaims all liability for any misuse.
I. Introduction
Android ARM reverse engineering is a critical skill for security researchers and software analysts. In this article, we explore how to perform Android ARM reverse engineering on a native ARM32 binary challenge. First, we demonstrate a classic manual reverse-engineering approach to analyze the binary’s logic and recover the valid product key. In the second phase, we apply symbolic execution using the angr framework to automatically discover a valid key. This guide highlights how both manual and automated techniques can be used to solve Android ARM reverse engineering challenge effectively.
II. Environment Setup
This section outlines the core components required to execute the challange.
A. Tools
The analysis relies on a set of tools suited for both static inspection and automated analysis of Android ARM native binary:
Binary Ninja for static analysis.
GDB for dynamic analysis.
QEMU for binary emulation.
angr (Python) for symbolic execution.
Android adb tool for interacting with the target environment.
Download the Challenge:
- OWASP MSTG crackme page: https://mas.owasp.org/crackmes/.
- Binary name: Android UnCrackable DRM
B. Basic Execution
Because the binary is compiled for ARM Android, we cannot execute it directly on our x86_64 Linux host. To run the binary on our machine, we will use qemu-arm-static, which provides user-mode emulation for ARM executables.
First, we prepare a minimal ARM sysroot. We create a directory and pull the necessary Android system libraries from a real device using the adb tool:
mkdir -p arm_sysroot
adb pull /system/bin/linker arm_sysroot/system/bin/
adb pull /system/lib/libc.so arm_sysroot/system/lib/
adb pull /system/lib/libdl.so arm_sysroot/system/lib/
adb pull /system/lib/libm.so arm_sysroot/system/lib/
adb pull /system/lib/liblog.so arm_sysroot/system/lib/
adb pull /system/lib/libstdc++.so arm_sysroot/system/lib/
Once the sysroot is ready, we can execute the ARM32 binary on our x86_64 machine using qemu-arm-static. We simply point QEMU to our extracted Android libraries using the -L option and provide the binary and its argument:
# Execute the ARM binary ('validate') on an x86_64 host using QEMU static emulation.
# The -L flag points QEMU to the ARM sysroot directory containing necessary libraries.
qemu-arm-static -L arm_sysroot ./validate ABCD-1234-EFGH-5678
This allows us to run the Android ARM binary natively on our Linux machine without needing a full device environment.
III. Solution 1 — Reverse Engineering
This is the manual RE part.
1. Inspect the Binary
Before starting any analysis, it’s always a good idea to inspect the binary’s basic metadata using the file command.
This output tells us several important things about the binary:
- ELF 32-bit – The binary uses the standard Executable and Linkable Format and is compiled for a 32-bit architecture (ARM in this case).
- LSB – Little-endian byte order (Least Significant Byte first), which affects how integers are interpreted in memory and disassembly.
- Shared object – Indicates a dynamically linked executable rather than a statically linked binary; it depends on external libraries at runtime.
- ARM – Confirms the CPU architecture is 32-bit ARM, matching our need to use qemu-arm-static to run it on an x86_64 Linux host.
- Dynamically linked – Shows that the binary relies on shared libraries like libc.so, libm.so, etc., which we pulled from the Android device to our host.
- Interpreter /system/bin/linker – The dynamic linker/loader used to load and link libraries at runtime.
- Stripped – The binary has no symbol names or debug information, so we must rely on disassembly or decompilation for reverse engineering.
Understanding these properties helps us prepare the proper environment and tools to analyze and execute the binary safely on our Linux machine.
# Command to check the file type and architecture of the binary.
file validate
validate: ELF 32-bit LSB shared object, ARM, EABI5 version 1 (SYSV), dynamically linked, interpreter /system/bin/linker, stripped
2. Initial static Analysis in binary ninja
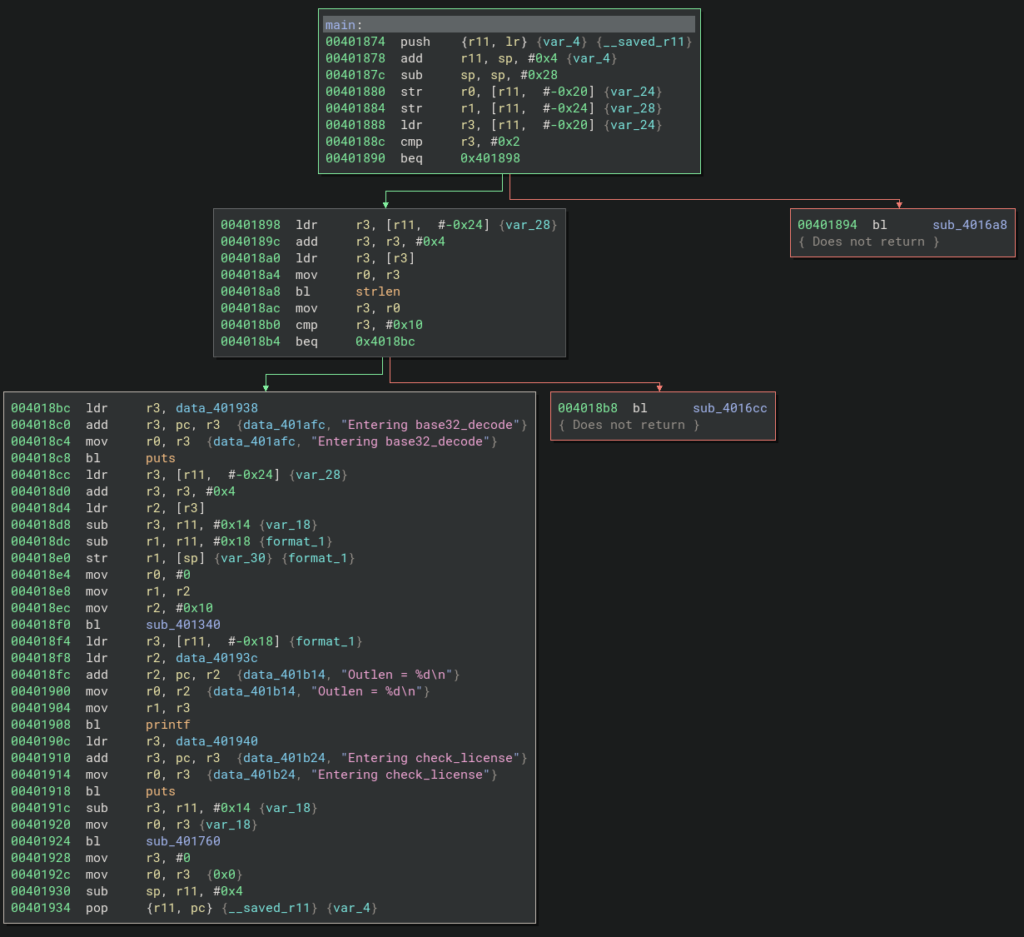
After loading the binary in Binary Ninja, we need to rebase the addresses by navigating to Analysis → Rebase and setting the entry to address 0x40000000. After rebasing, we can analyze the code to identify the most important sections, as shown in the figure.
From this code block, we can see that the binary first checks the input length using the instruction cmp r3, #0x10, ensuring that the input is exactly 16 bytes (0x10 in hexadecimal) before proceeding. After this validation, the input is decoded from Base32 and then passed to the sub_401760 function, which checks the license key.
3. Locate the Validation Logic
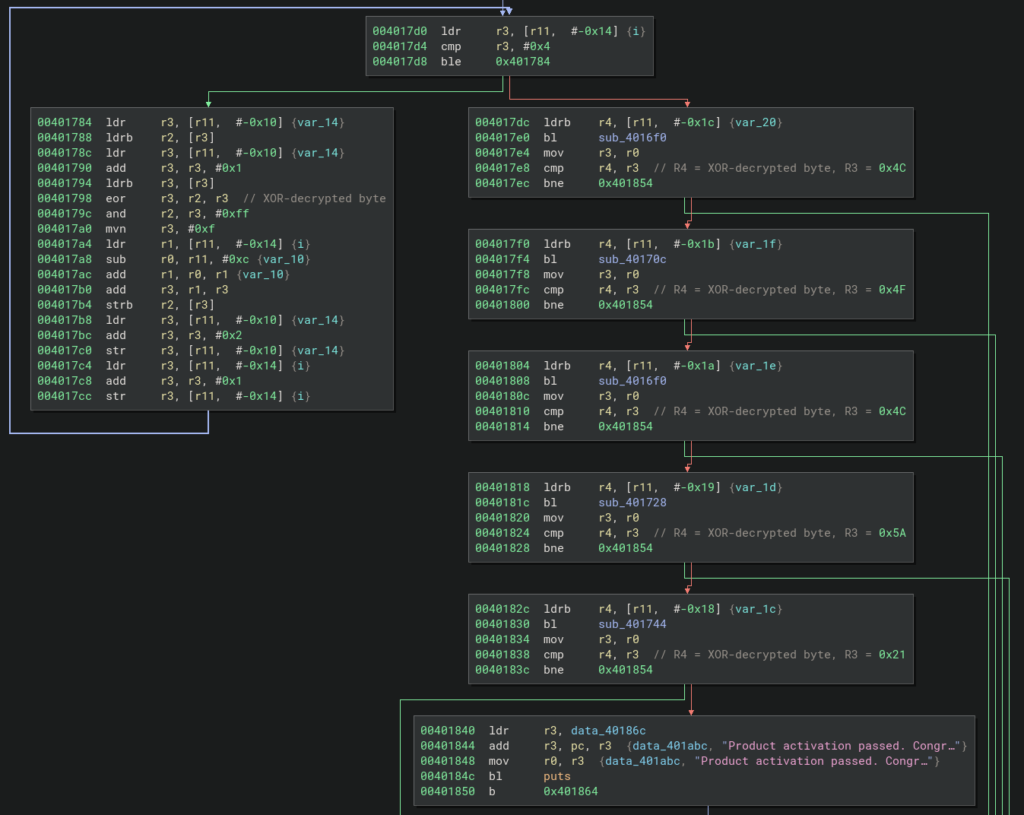
After identifying the most important function, we can proceed to analyze its logic. As shown in the figure, the function has two branches: the left branch decrypts the Base32-decoded key, while the right branch checks each decoded byte against the valid key. We have added comments to the most important instructions in each block to clarify their purpose.
4. Analyze the Function
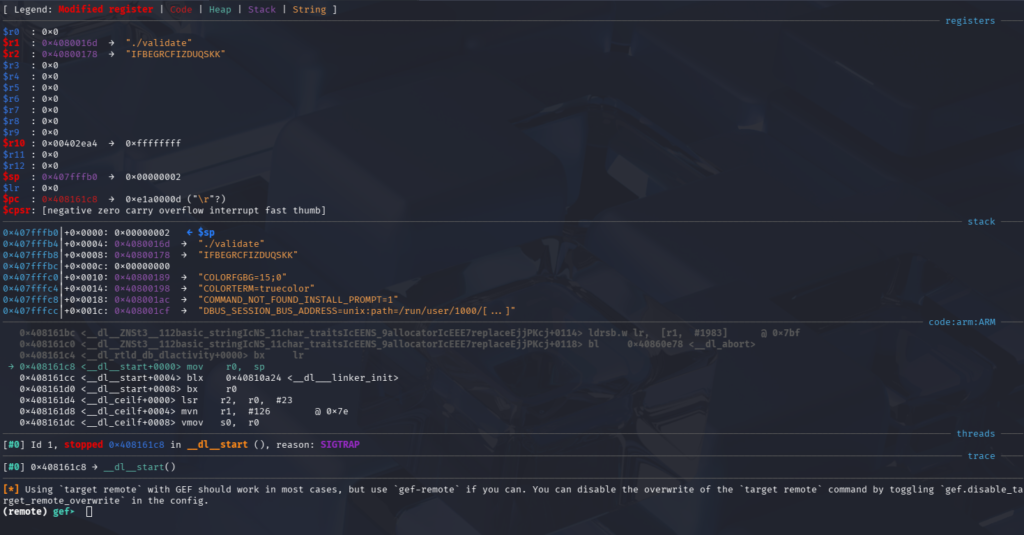
We begin our analysis by focusing on the left branch to understand the logic behind the decryption function. For this purpose, we use GDB for dynamic analysis. As a test input, we use the value IFBEGRCFIZDUQSKK, which is Base32-encoded. After decoding, this value corresponds to the string ABCDEFGHIJ.
We then start the binary using the following commands:
# Terminal 1: Launch QEMU for ARM emulation with GDB server on port 1234
└─$ qemu-arm-static -g 1234 -L arm_sysroot ./validate IFBEGRCFIZDUQSKK
# Terminal 2: Launch GDB and connect to QEMU
In another terminal, we launch GDB:
└─$ gdb-multiarch ./validate
Next, inside GDB we set the architecture and connect to the remote target:
set architecture arm
target remote :1234
As shown in the GDB screenshot, the R2 register holds our input key. The next step is to create a breakpoint at the function sub_401760 to observe the input passed to it before continuing the analysis.
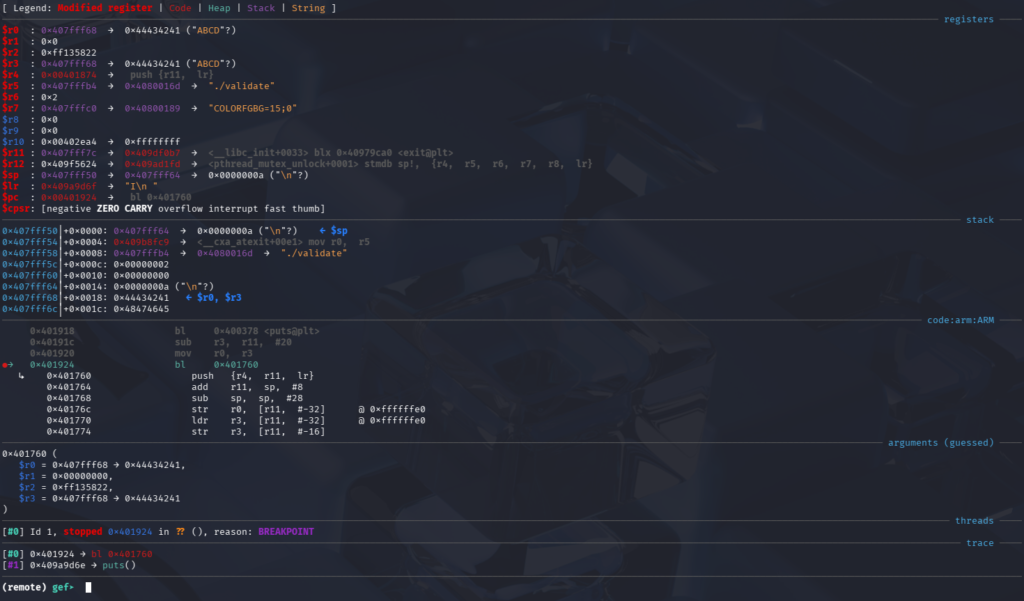
We set a breakpoint at the function entry and then resume execution to trigger it using the following commands: b *0x00401924 and c
After hitting the breakpoint, we can see from the screenshot that the function sub_401760 takes the Base32-decoded key as its input. We can observe, for example, that the first four bytes of the decoded key are stored in the R0 register.
To step into the function instruction by instruction in GDB, we use the si command. We begin our analysis with the left branch, where we observe a loop at address 0x004017D4 containing the instruction cmp r3, #0x4, which causes the loop to execute five times.
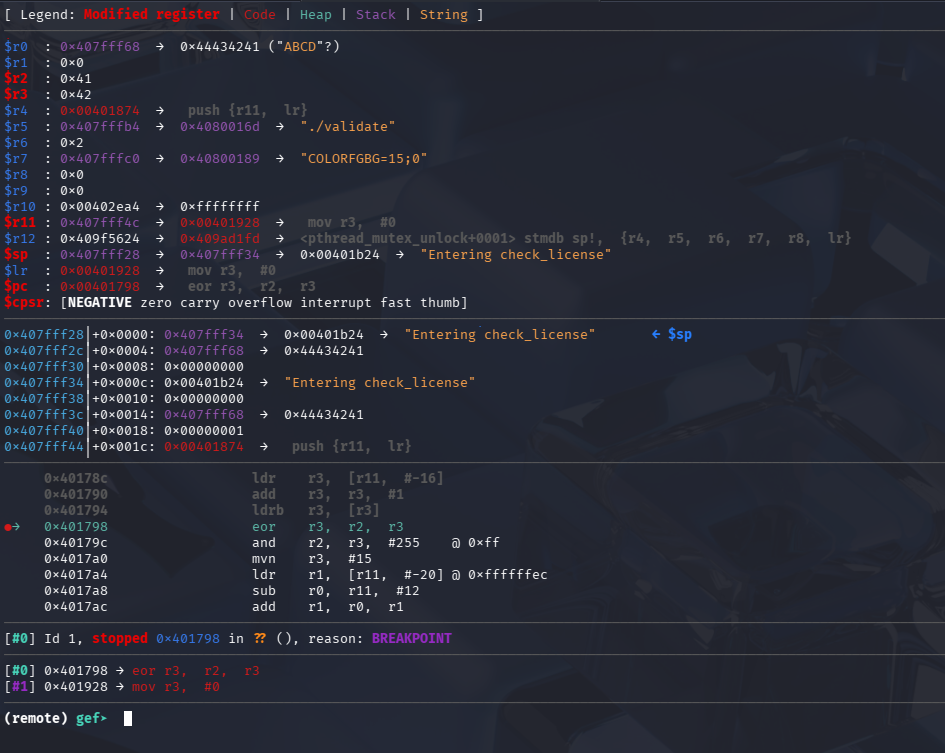
After this comparison, we encounter the instruction at 0x00401798: eor r3, r2, r3
This instruction performs an XOR operation. To better understand the inputs involved in this operation, we set a breakpoint at this address and continue execution.
From the screenshot, we can observe that the R2 register holds the first character, A (0x41), and the R3 register holds the second character, B (0x42). The result of the XOR operation is 0x3.
When we use the c command again to continue execution, we hit the breakpoint a second time. This time, R2 contains C (0x43) and R3 contains D (0x44), and their XOR result is 0x7. The loop continues this process, performing the XOR decryption on all the bytes in the input key until the entire sequence has been processed.
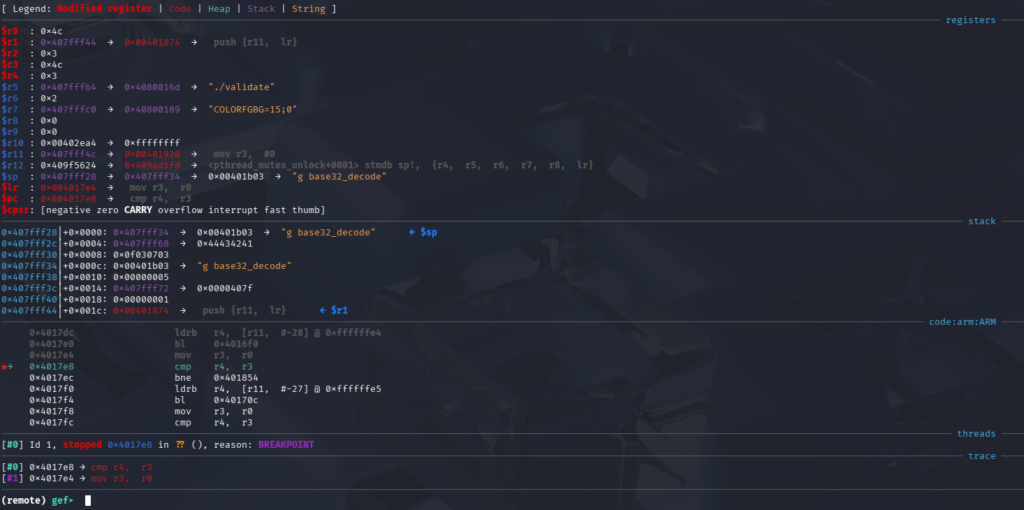
After completing the decryption, the algorithm moves to the right branch to verify the decrypted key against the valid key. We can set a breakpoint at the first comparison instruction to observe what values are being compared: b *0x004017E8
The instruction compares the current byte of the decrypted key (R4) with the corresponding byte of the valid key (R3), allowing us to see how the validation proceeds.
From the screenshot, we can see that the R4 register holds the first decrypted byte (0x03), while the R3 register holds the corresponding valid byte (0x4C). In this case, the algorithm will branch to the block that displays the “Incorrect serial” message because we did not enter the correct key.
However, to continue analyzing the remaining validation logic and observe all valid key comparisons, we need to bypass this check. To do so, we can manually modify the registers so that the comparison succeeds. By setting R4 and R3 to the same value, the cmp instruction will pass and execution will continue to the next check. Below is the pseudocode of the product key validation algorithm:
🔑 Key Validation Algorithm
Input:
- EncodedKey (Base32 string), size = 16, example = IFBEGRCFIZDUQSKK
✨ Execution Example
Output Decoding:
Decoded bytes: A B C D E F G H I J Hex values: 41 42 43 44 45 46 47 48 49 4A
XOR Computations:
(0x42 XOR 0x41) → 0x03 (0x44 XOR 0x43) → 0x07 (0x46 XOR 0x45) → 0x03 (0x48 XOR 0x47) → 0x0F (0x4A XOR 0x49) → 0x03
Validation Check:
Compare [0x03, 0x07, 0x03, 0x0F, 0x03] with expected XOR results [0x4C, 0x4F, 0x4C, 0x5A, 0x21]
→ Fails
Algorithm Steps (Summary):
- Decode Input:
DecodedBytes = Base32_Decode(EncodedKey) - Initialize Array:
XorResults = [] - Compute XOR: Iterate and calculate
R3 XOR R2for all five pairs. - Compare Results: Check if
XorResults[i] == ExpectedXor[i]. If not, exit (Validation fails). - Success: If all checks pass, Validation succeeds.
5. Generating a valid key
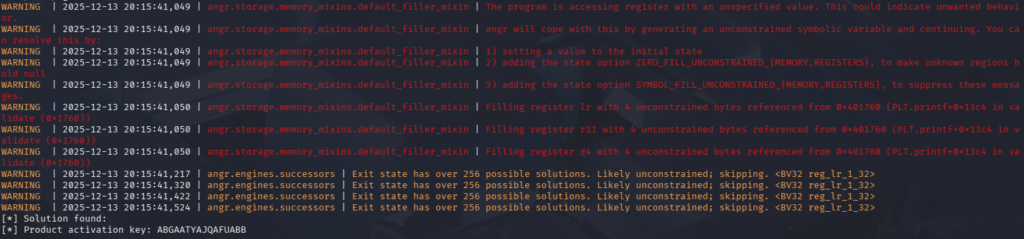
After summarizing the algorithm that decrypts and validates the product key, we now present how to generate a valid key.
🔒 Generating a Valid Product Activation Key
After reversing the validation routine, we can invert the algorithm to generate a valid product key.
Inversion Logic (XOR Property):
R3 XOR R2 = ExpectedValue
↓
R3 = ExpectedValue XOR R2
🔰 Choose the Known Bytes (R2)
We select five arbitrary values for the known bytes (R2), corresponding to the first byte of each decoded pair.
- R21: 0x41 ('A')
- R22: 0x43 ('C')
- R23: 0x45 ('E')
- R24: 0x47 ('G')
- R25: 0x49 ('I')
Pattern so far: AXCXEXGXIX
🧮 Compute the Missing Bytes (R3)
Using the required Expected XOR values and the chosen R2 values, we calculate the missing R3 byte for each pair.
Expected XOR values: [0x4C, 0x4F, 0x4C, 0x5A, 0x21] X1 = 0x4C XOR 0x41 = 0x0D X2 = 0x4F XOR 0x43 = 0x0C X3 = 0x4C XOR 0x45 = 0x09 X4 = 0x5A XOR 0x47 = 0x1D X5 = 0x21 XOR 0x49 = 0x68
📄 Construct the Final Decoded Key
| Index | R2 (Chosen) | R3 (Calculated) |
|---|---|---|
| 1 | 0x41 | 0x0D |
| 2 | 0x43 | 0x0C |
| 3 | 0x45 | 0x09 |
| 4 | 0x47 | 0x1D |
| 5 | 0x49 | 0x68 |
Final Decoded Byte Sequence (10 bytes):
0x41 0x0D 0x43 0x0C 0x45 0x09 0x47 0x1D 0x49 0x68
Then, we use the following command to encode the generated key in Base32:
# Convert the calculated 10-byte hex sequence (Decoded Key) into Base32 format.
echo -n "410d430c4509471d4968" | xxd -r -p | base32
IV. Solution 2 — Symbolic Execution with angr
Symbolic execution is especially valuable in reverse engineering because it models program inputs as symbolic variables rather than fixed values, allowing an analyst to explore many execution paths at once. This approach makes it possible to automatically infer constraints, recover valid inputs, and understand complex validation logic without stepping through every branch manually. In practice, tools like angr enable reverse engineers to combine symbolic execution with real binaries, making it feasible to solve crackmes, analyze license checks, and bypass deeply nested conditions efficiently. For readers interested in both the theoretical foundations and hands-on applications, the official angr documentation provides well-structured examples and tutorials that demonstrate how symbolic execution can be applied to real-world reverse-engineering scenarios.
1. Install angr
angr is a library for Python 3.10+ and must be installed in a Python environment before it can be used. Follow this tutorial to set it up.
2. Identify Critical Addresses
In this part, we prepare the automation for finding the valid product key using angr. First, we need to identify the entry point for our analysis, which in our case is the function sub_401760. Next, we identify the address of the success routine, where the program prints the message “Product activation passed. Congr..”. This address will be used as the target state during symbolic execution.
- START_ADDR = 0x00401760
- SUCCESS_ADDR = 0x00401840
3. Building the angr Script
This script uses symbolic execution with angr to automatically recover a valid product activation key from the target binary by focusing on the key validation routine sub_401760 located at address 0x401760. Instead of executing the program from its entry point, execution begins directly at this function, allowing the analysis to skip initialization code and concentrate on the core verification logic. The 10‑byte input is modeled as a symbolic value, placed in memory, and passed to the function through the appropriate register. angr then explores all feasible execution paths until it reaches the success address at 0x401840, where the key is accepted. Once this path is found, the constraint solver concretizes the symbolic input into a valid activation key, which is finally encoded in Base32 to match the format expected by the program.
# Python script using angr for symbolic execution to solve the key validation function.
import angr
import claripy
import base64
proj = angr.Project("./validate", auto_load_libs=False)
inp = claripy.BVS("inp", 10 * 8)
state = proj.factory.blank_state(addr=0x401760)
state.memory.store(0x10000, inp)
state.regs.r0 = 0x10000
simgr = proj.factory.simulation_manager(state)
simgr.explore(find=0x401840)
solution = simgr.found[0].solver.eval(inp, cast_to=bytes)
print("[*] Solution found:")
print("[*] Product activation key:", base64.b32encode(solution).decode())
By executing the Python script, we can obtain the correct product key directly, avoiding the need to manually reverse the XOR decryption logic or inspect every validation step.
Conclusion
This article successfully demonstrated two complementary approaches to solving a simple ARM binary: manual reverse engineering for functional understanding, and symbolic execution for automated solution derivation.
The combined use of these techniques establishes a powerful and efficient workflow for binary analysis, utilizing symbolic execution to automatically solve constraints once the analysis domain is confined by manual inspection.
References
Most Recent Posts
- All Posts
- Exploit Development
- Fuzzing
- Penetration Testing
- Reverse Engineering
- Vulnerability Research


